


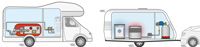
What do you need for an LPG installation in a RV Camper, Caravan, Foodtruck or Motorhome for domestic use such as cooking and heating?
You may be interested in an LPG installation for domestic use of LPG gas in your RV camper (also called Motorhome), caravan, or food truck because you want to use it for cooking or heating, for example. We also call such an LPG installation a vapor gas system because the gas tank used does not deliver liquid LPG, but vaporized LPG (thus in gaseous form). Such an LPG installation must comply with various safety requirements and installation regulations. In this article, we will try to cover and summarize this as best as possible. Since this article focuses on LPG use in RV campers and caravans, the requirements for LPG installations in food trucks and static caravans are not specifically mentioned. The requirements for these may differ on some points.
The following related tutorials are connected to this article:
LPG Vapor Tanks for RV Campers, Caravans and Food Trucks
Pressure Regulators for Gas Bottles and Vapor Tanks
Installation instructions for LPG cylinder tanks (vapor tanks) in (recreational) vehicles
The EN 1949 Standard: The European Standard for Safe LPG Systems in RVs and Caravans
What is an LPG Gas Bottle and what different types are there?
What are the applicable regulations and guidelines?
Below are the most important guidelines applicable to LPG installations in recreational vehicles such as RV campers and caravans.
- EN 1949 European requirements for the installation of LPG systems for domestic use in leisure accommodation vehicles and for accommodation in other vehicles. EN 1949 specifies requirements for the installation of liquefied petroleum gas systems for habitation purposes in leisure accommodation vehicles and for accommodation purposes in other vehicles. It describes health and safety requirements relating to: - the choice of materials; - components and appliances; - design considerations; - tightness testing of installations; - the content of the user manual. This document only applies to installations supplied with gases of the third family (LPG). It does not specify: - water connections or electrical supplies to the appliance(s); - portable appliances, with their own LPG supply; - the installation of LPG appliances for commercial purposes; - LPG installations on boats; - LPG supply equipment and LPG appliances separate from and outside the body of the vehicle. This document applies to LPG tanks meeting the requirements of the Pressure Equipment Directive (2014/68/EU). Attention is drawn to the Pressure Equipment Directive (2014/68/EU) for all parts of the installation operating above 0.5 bar.
- NPR 2577 Dutch requirements for the installation of LPG systems for use in leisure vehicles, caravans, food trucks and other vehicles. The scope of this guideline covers the installation, maintenance, and re-inspection of LPG systems for use in leisure vehicles and other road vehicles. This guideline also applies to food trucks. The requirements for the installation of LPG systems in leisure vehicles and other road vehicles have been adopted and translated from EN 1949. (This regulation applies in the Netherlands to food trucks. For recreational vehicles such as campers and caravans, guideline EN 1949 applies)
- The DVGW G607 regulation is a German standard that provides guidelines for the installation and maintenance of gas systems in recreational vehicles, such as campers, caravans, and boats. This regulation aims to ensure safety when using gas installations in these vehicles. DVGW stands for Deutscher Verein des Gas- und Wasserfaches, an organization that develops standards and guidelines for gas and water installations. (This guideline and approval is mandatory for recreational vehicles in Germany and is based on EN 1949 but is more extensive and describes, for example, the securing of the LPG tank and gas bottle.)
- UN/ECE Regulation No. 122 ANNEX 8: Uniform technical prescriptions concerning the approval of vehicles of categories M, N and O with regard to their heating systems. Safety requirements for LPG combustion heaters and LPG heating systems (Recreational vehicles equipped with an LPG heating system must comply with the requirements of this regulation.)
- Directive 2014/68/EU (the Pressure Equipment Directive - PED) regulates the safety of pressure equipment when in operation with a pressure above 0.5 bar (for example, an installed gas bottle).
- UN/ECE Regulation No. 67: European approval of specific components of vehicles of categories M and N using LPG in their propulsion system. (For recreational vehicles, this regulation applies to the LPG components in contact with liquid LPG, such as the filler connection, filler hose, and LPG tank)
- EN 12979: LPG systems and components for road vehicles - Installation requirements. (For recreational vehicles, this regulation applies to the mounting and electrical installation of the LPG tank. In the Netherlands, the RDW LPG installation guidelines apply.)
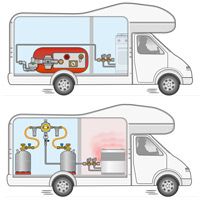
Assembling an LPG installation for your recreational vehicle can be quite complex.
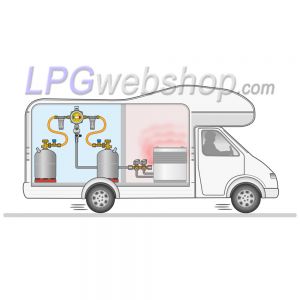
A LPG vapor system in your RV camper, caravan, or food truck can be assembled in various configurations; think of different sizes, shapes, and numbers of gas tanks, but also the method of mounting and location of the gas tank (think of internal or underfloor mounting). Then there are the different types of filler connections, different types of pressure regulators, and the pipework downstream of the pressure regulator (low-pressure line) to the various gas appliances, with or without quick-closing valves, branches, and/or quick connectors.
The further layout of the RV camper must be taken into account, such as the location of the kitchen and water storage, etc. Also, the LPG installation must comply with many safety requirements and applicable regulations, such as sufficiently strong mountings, ground clearance, distance from heat sources like the exhaust, venting of excess pressure gases to the outside, etc., etc.
In short, this is quite a complex and challenging job that needs to be well planned and designed to meet all requirements. Since there are many different types of vehicles and variants, unfortunately, there are no standard LPG installations for RV campers (also called Motorhome). But this needs to be personalized (designed) based on the vehicle, its layout, and the needs and wishes of the customer, and also comply with all safety requirements and regulations.
Ensure a correct and safe installation and use of the LPG system! Below we mention some important aspects of these safety requirements and regulations (based on the EN 1949 guideline, the DVGW G 607 regulation, EN 12979 guideline, and the UN/ECE 67R regulation.)
- Main Rule: Have the LPG system installed by a certified LPG installer! And have the entire installation approved according to EN 1949 / G 607 (or another applicable national approval) by a competent authority / expert.
- The installer must issue a declaration stating that the LPG system complies with EN 1949, including the test results.
- Road vehicles such as a RV camper, caravan, or food truck must be equipped with a sticker/label indicating that all gas appliances must be switched off during refueling (LPG, Petrol, Diesel, or other fuel).
- The LPG tank and refillable LPG gas bottle must be permanently and properly secured so that they remain in position while driving or in an accident. Follow the guidelines EN 12979 (or RDW LPG installation guidelines) / G 607 for this. And as an aid, our tutorial Installation Instructions for LPG Cylinder Tanks (Vapor Tanks) in Vehicles
- Use only installation and mounting materials permitted for the intended use.
- The LPG system must be subjected to a leak test after installation, as described in EN 1949.
- All parts of the LPG system that come into contact with liquid LPG must comply with the technical requirements in the Pressure Equipment Directive (2014/68/EU) and/or UN/ECE Regulation No. 67.
- Do not place LPG Tank(s) / LPG Gas Bottle(s) in the cabin, living area, or engine compartment, but only in the open air (underfloor mounting) or in a special compartment separated from the living area and whose floor is connected/ventilated with the outside space and meets other requirements in EN 1949. An exception to this rule is if the LPG tank is provided with a gas-tight housing and is vented via a vent hose and a floor vent, and further according to the requirements in EN 12979.
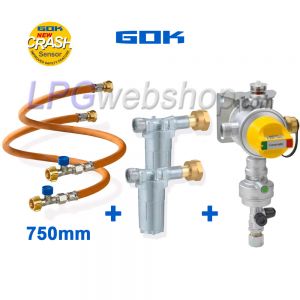
- When using 2 LPG gas bottles or 2 LPG vapor tanks, the outlets of the gas tanks must not be directly connected to each other. It must be impossible for gas to flow from gas tank A to gas tank B or vice versa. For this, a changeover device is used that ensures the gas bottles are never interconnected and automatically prevents gas from escaping if one of the two gas bottles is not connected.
- The maximum flow capacity of the LPG system must not exceed 1.5 kg/h.
- While driving, gas bottles and gas tanks must be shut off, and this must be indicated with a good and easily visible permanent label at the gas tank / gas bottle. An exception to this is if safety measures have been taken, such as the use of (a high-pressure gas hose with hose rupture valve and) a pressure regulator with crash sensor and any additional requirements in EN 1949 and/or UNECE Regulation R 122 annex 8.
- For underfloor mounting, a minimum ground clearance of 20 cm between the tank and the road surface is required.
- Maintain the minimum prescribed distance from heat sources, such as an exhaust. For shorter distances, a heat shield must be installed.
- No part of the LPG installation may be the lowest part of the vehicle (with the exception of the LPG tank).
- Gas hoses and pipes must be protected against wear and vibrations. Regularly check gas hoses and pipes for wear. If the gas hoses/pipes are damaged or show signs of wear, replace them (use gas hoses and pipes of the correct quality).
- After installation, check all connections for leaks.
- Ensure there is sufficient ventilation in the cabin and living area to guarantee safe operation of the gas system, so there is no danger of carbon monoxide poisoning or gas accumulation.
- Ensure gas installations are regularly inspected and approved, both during installation and during use. This ensures any defects are detected and remedied in time.
- Observe all safety aspects and instructions indicated by regulations and manuals. See further instructions in the related tutorials on a specific subject and the applicable regulations and guidelines. (For example G 607 and EN 1949)
What are the main components of a LPG vapor system?
In this article, we explain step by step what main components a LPG vapor system consists of, from the filler connection to the low-pressure line.
The choice of the version or size of the component depends on the design and is therefore best determined by the customer/installer themselves, as they can determine what fits in the RV camper, what the exact wishes are, and how the LPG installation will be used (heating, cooking, BBQ, etc.). Therefore, an overall plan must be made that is personalized and specifically meets your wishes, complies with applicable safety requirements, and is also technically feasible.
(We do NOT cover the final gas appliances, possibly associated flue, gas bottle and gas tank compartment, and associated safety requirements in this article. For further specific safety requirements regarding the various final gas appliances, flue, and gas bottle/gas tank compartment, we refer to the EN 1949 guideline.)
Below is an overview of gas components covered for a standard LPG installation in a RV camper, caravan, or food truck, listed in the direction of gas flow: (later in this article, each component is further elaborated and described.)
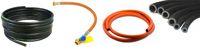
Filler Connection and Filler Hose: An external connection point on the vehicle to connect to the LPG filling nozzle at the filling station. Available in various models, versions, and with different couplings for different countries. A filler hose connects the back of the filler connection to the inlet of the LPG tank. A filler hose is available in various lengths and with straight or angled connections, depending on the available space and the distance between the filler connection and the LPG tank.
LPG tank / LPG gas bottle: This component stores the liquid LPG and also vaporizes it so that the gas leaves the gas tank in gaseous form. We distinguish between LPG vapor tanks and LPG gas bottles. The difference lies in the shape and the method of placement and use. An LPG vapor tank is usually cylindrical and used in a horizontal position, but there are also toroidal-shaped LPG vapor tanks (the shape of a wheel) that are better suited for the spare wheel location. Both types of gas tanks can be used for internal or external placement and have the tank valves more or less on the side of the gas tank. An LPG gas tank will be approved for refueling. An LPG gas bottle is also cylindrical but stands upright (vertical position) and is provided with a base with a foot on which it can be placed. The tank valves on an LPG gas bottle are at the top. There are exchangeable LPG gas bottles and refillable LPG gas bottles.
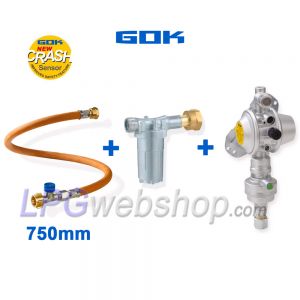
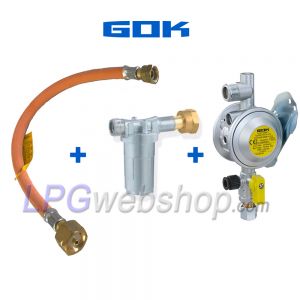
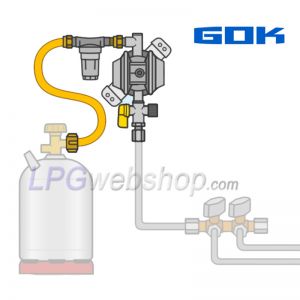
High-Pressure Gas Hose: This component makes a connection between, on one side, the gas bottle and, on the other side, the inlet of the pressure regulator. This high-pressure hose is only used if the pressure regulator is not connected directly to the outlet of the gas bottle but is mounted, for example, against the wall or floor of the vehicle.
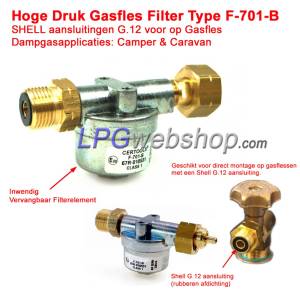
High-Pressure Gas Filter (optional): This type of filter is often used in RV Campers or Caravans to capture paraffin (fats and oils) and any other contamination in liquid form or particles in solid form (e.g., sand or iron) and thus prevent them from entering the pressure regulator and the rest of the system.
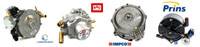
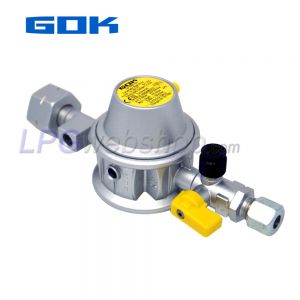
Pressure Regulator: A pressure regulator is connected (with or without the interposition of a gas filter and/or high-pressure hose) to the outlet of an LPG vapor tank or gas bottle, with the aim of reducing and regulating the pressure to a stable and low working pressure of, in most cases, 30 mbar. (Older LPG systems use a working pressure of 50 mbar and sometimes also 39 mbar). This pressure reduction is necessary because the pressure coming from the gas tank is much too high. Pressure regulators come in many variations with different connections and outlet pressures and different optional accessories.
Low-Pressure Line: After the pressure regulator (downstream) begins the low-pressure line that further transports the gas to the gas appliances. For this, rigid gas pipe and flexible gas hose are used, as well as various (quick) connectors, distribution pieces, and quick-closing valves.
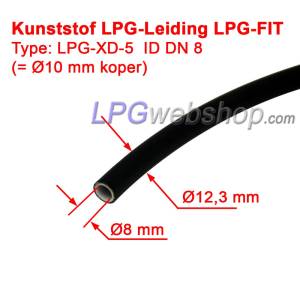
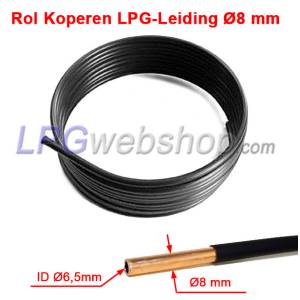
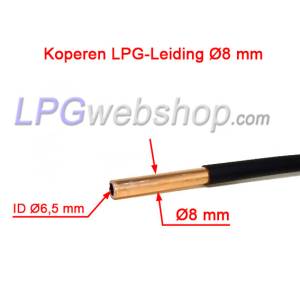
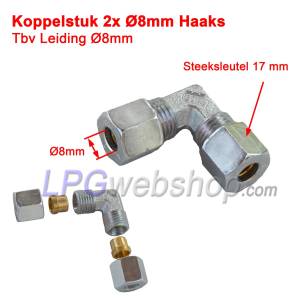
Rigid Gas Pipe (low pressure): The most common type of pipe is copper gas pipe with an outer diameter of 8mm (sometimes also 10mm).
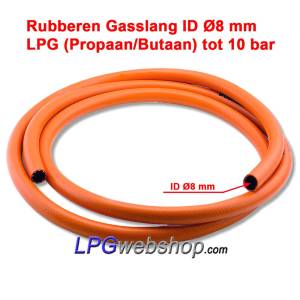
Flexible gas hose (low pressure): Orange rubber or plastic gas hose is usually only used to bridge short distances between, for example, a movable gas appliance and the rigid gas pipe.
Connectors and Quick Connectors: Connectors that may be used to connect gas pipe and gas hose to other components such as a gas bottle, pressure regulator, shut-off valve, gas appliance, or another gas pipe or gas hose.
Shut-off Valves and Quick-Closing Valves: Various shut-off valves and taps need to be used in an LPG installation to make the system safe and usable. The valves themselves and their installation must comply with strict safety requirements.
Filler Connection and Filler Hose
To fill an LPG gas bottle or LPG tank with LPG, an external filler connection (connection point on the outside of the vehicle) and a connecting hose (filler hose) between the gas tank and the filler connection are needed.
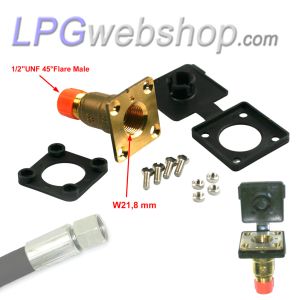
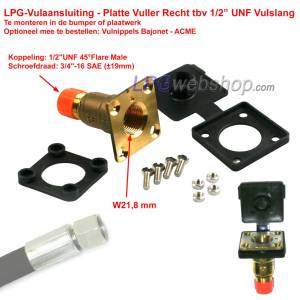
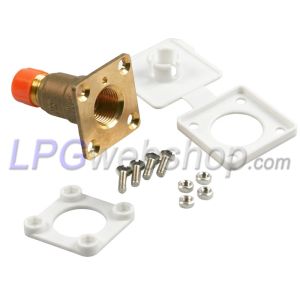
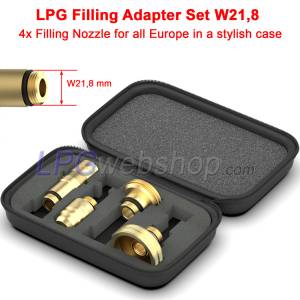
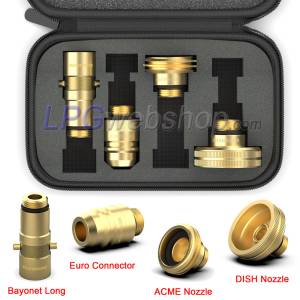
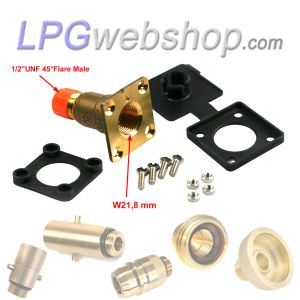
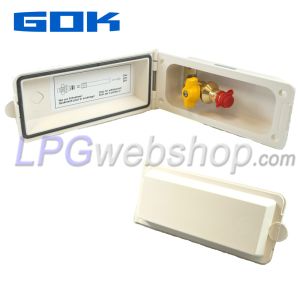
External filler connections come in different types and variants so that a suitable filler connection can be found for most vehicles and locations. For example, there are recessed filler connections provided with a plastic box that can be integrated into the bumper or bodywork (provided there is sufficient space behind the panel). If less space is available, a flat filler (W21.8) can also be chosen, where a filler spout (country-dependent) needs to be screwed in to be able to refuel. The separate filler spout is then not integrated into the filler connection, which saves on dimensions. The connection at the back can be angled or straight, depending on the available space. Nowadays, there are also mini-fillers that are made even more compact so that they are suitable for placement behind the petrol flap in certain cars. Furthermore, there is a distinction in the type of connection at the back of the filler connection, Type A; with a 1/2"UNF Conical Flare connection (standard for filler hoses) or type B; with an 8mm compression fitting for 8mm copper pipe or plastic pipe.
Some safety requirements regarding the filler connection:
- The LPG filler connection will be located on the outside of the vehicle and will have a minimum distance of 50 cm from:
- a fan for the living space
- an opening part of a window
- an exhaust flue
- The back of the filler connection must not discharge into the living area, cabin, or other interior space.
- Furthermore, the installation guidelines as per EN 12979 (or applicable national guidelines such as the RDW LPG installation guidelines in the NL) apply.
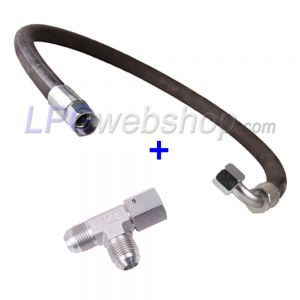
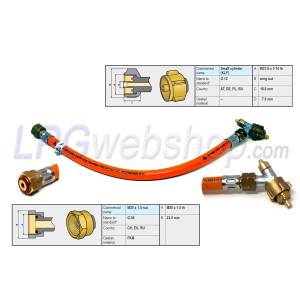
Filler Hoses: Standard filler hoses are equipped with 1/2"UNF couplings, which are either both straight or 1x straight and 1x angled. Furthermore, filler hoses are available in fixed sizes in steps of 25cm from 0.5m to a maximum of 3.5m. These filler hoses are not adjustable in length.
Since it is sometimes difficult to determine in advance what length of filler hose will be needed, we also have a custom-make filler hose where you can easily clamp the couplings yourself. These couplings come in the previously mentioned coupling variants of a 1/2"UNF and 8mm compression in straight or bent variants.
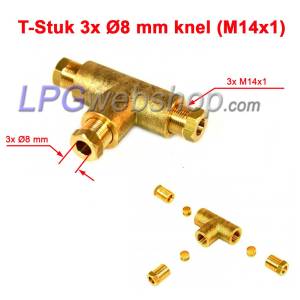
If you want to fill two gas bottles or gas tanks simultaneously via one filler connection, you can use a T-piece to split the filler connection or loop the tanks. In this case, you need two filler hoses.
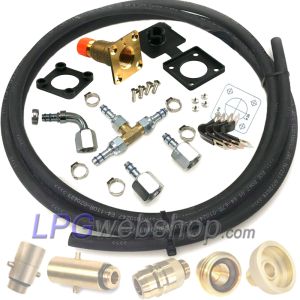
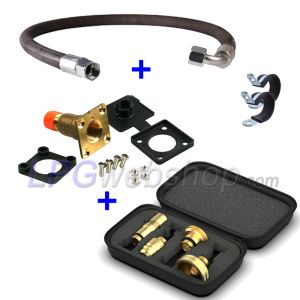
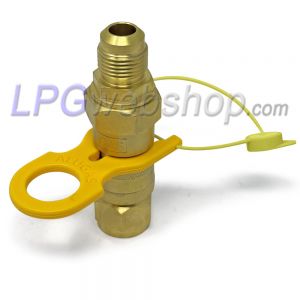
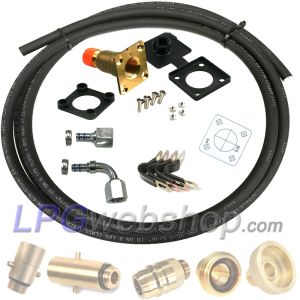
Product examples of LPG filling parts


LPG Refueling. May I fill my LPG installation at a regular LPG filling station with LPG?
To be allowed to fill an LPG gas tank or refillable LPG gas bottle with LPG while it is in the recreational vehicle, it and the entire installation must comply with various applicable safety requirements and be equipped with proper approval. In some cases (countries), it is necessary to prove that the entire gas system has been approved. (via G 607 approval stickers or registration on the vehicle registration papers).
In Italy, it is only allowed to refuel with LPG at a regular LPG station if the LPG system is officially approved and registered on the vehicle's registration papers. The ministerial legislation of August 3, 2018 Prot. N. 19042 regulates the use and refueling of LPG tanks in recreational vehicles and its transcription in the vehicle registration certificate, as required by Art. 1 point (a) and (b) in the Official Journal No. 102 of 04.05.2018.
In addition to the safety requirements mentioned earlier, we list some additional safety requirements regarding LPG refueling below:
- The electrically or manually operated extraction valve directly at the outlet of the gas tank / LPG gas bottle must always be closed during LPG refueling. If a manual extraction valve is used, it must be located and operable in the immediate vicinity of the LPG filler connection on the vehicle. Or otherwise, an additional manual valve upstream of the pressure regulator will be placed, located and operable in the immediate vicinity of the LPG filler connection on the vehicle, or otherwise, an additional automatic valve upstream of the pressure regulator will be placed.
- The operation of an electrical extraction valve will be directly and easily accessible.
- A refillable LPG gas bottle / LPG gas tank must be equipped with a number of safety features such as an 80% filling limit with non-return valve, an overpressure valve, a flow limiter, and a closable extraction valve (Manual or Electrical) and valid approval (UN/ECE Regulation No. 67).
- A refillable LPG gas bottle / LPG gas tank must be permanently and sufficiently firmly secured in the vehicle (According to EN 12979 or applicable national guidelines).
- The installation from the filler connection to and including the gas tank must comply with the safety requirements mentioned in EN 12979 (or applicable national guidelines such as the RDW LPG installation guidelines in the NL).
- The installation from the filler connection to the gas tank and from the gas tank to the pressure regulator must undergo a leak test using a leak detection fluid.
- The entire LPG installation must comply with the safety requirements (EN 1949 / G 607 / EN 12979), be equipped with valid approval, and in some countries also be registered on the vehicle registration.
Furthermore, additional conditions or prohibitions may apply per country and filling station. For example, self-service LPG refueling or filling gas bottles is not permitted in every country.
NOTE! Keep in mind that in some countries (Italy and a number of Eastern European countries) self-service LPG refueling is not permitted. This may only be done by the filling station staff. Inform yourself about the rules of each country where you wish to refuel.
TIP! When filling the LPG gas tank or LPG gas bottle for the first time
In addition to a mandatory leak test, it is advisable to check the gas tank and connections (such as the valves on the tank, the filler hose, and filler connection) extra for any leaks before filling the gas tank with LPG. To pressurize the gas tank, you can simply connect the filling nozzle from the LPG filling station to your filler connection (without activating the pump). This allows a limited amount of LPG to flow from the filling nozzle and hose into the gas tank, as it is still free of pressure. This limited amount of LPG vaporizes in the gas tank and thereby builds up a gas pressure in the gas tank sufficient to detect any leaks. LPG is also strongly odorous, so a leak should also be noticeable because of that. Check carefully for leaks with a gas leak detector spray (or as an alternative, a plant sprayer with soapy water) and spray it on the various couplings and connections. Only when you know everything is leak-free and properly connected is it possible to fill the tank further.
LPG Gas Storage in an LPG Gas Bottle or LPG Gas Tank. How does that work?
The most important component of the LPG vapor system is the LPG gas tank or LPG gas bottle (or multiple) for storing the LPG. The choice for a gas bottle or gas tank depends on the required storage capacity and the available space in or under the RV camper, caravan, or food truck.
An LPG gas tank and LPG gas bottle are indeed filled and stored with liquid LPG, but a small amount also vaporizes and collects in the upper space of the LPG gas tank or LPG gas bottle. The gas is taken from the upper space, causing the gas to leave the LPG gas tank in gaseous form and the pressure in the LPG gas tank to drop. Due to the pressure drop, liquid LPG vaporizes again, causing the pressure to rise again. Vaporizing the LPG requires heat (energy). When the LPG vaporizes, the gas tank cools down slightly. The more heat available, the easier the LPG vaporizes and the pressure increases. With high gas consumption, a lot of LPG will therefore vaporize, causing the LPG gas tank to cool significantly. The vaporization process will then become increasingly difficult.
Vaporization Process and Temperature Dependence
The vaporization process requires heat extraction from the environment. Propane vaporizes better at low temperatures than butane. As a result:
- The gas pressure in the gas tank / gas bottle is strongly temperature-dependent
- At high consumption and cold conditions, the pressure can drop
- Consider an additional (external) gas bottle for more vaporization capacity for high demand
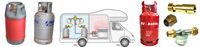
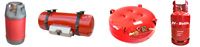
LPG Gas Bottle
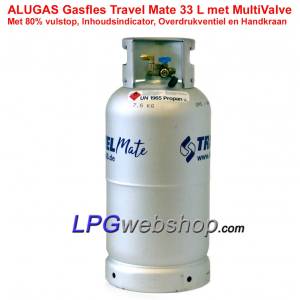
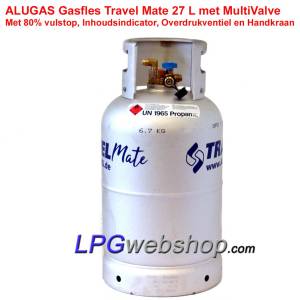
This component stores the liquid LPG and also vaporizes it so that the gas leaves the gas bottle in gaseous form. LPG gas bottles come in different sizes, can be made of different materials such as steel, aluminum, or plastic (composite). The LPG gas bottle must be equipped with valid approval depending on the type of LPG gas bottle and the type of use.
An LPG gas bottle stands upright (vertical position) and is provided with a base with a foot on which it can be placed. The tank valves on an LPG gas bottle are at the top. We distinguish between exchangeable LPG gas bottles and refillable LPG gas bottles.
These are the most important safety regulations regarding LPG gas bottles (in addition to those already mentioned earlier in this article).
- Always keep the gas bottle upright (with the valve at the top) so that only gas in gaseous form leaves the gas bottle.
- Do not drop the gas bottle because damage can occur to the bottle or the couplings.
- Do not store the gas bottle in the vicinity of open flame.
- Do not use or store below ground level. Leaked gas will accumulate at a low level.
- The storage space/compartment must be well and sufficiently ventilated with the outside space.
- Maintain the minimum distances from a heat source such as an exhaust, as mentioned in EN 1949.
- Do not use tools to open the valve.
- See further the safety requirements as mentioned in EN 1949 and Regulation 122 annex 8.
Refillable LPG gas bottle:
A refillable LPG gas bottle must be equipped with at least a number of safety features such as an 80% filling limit, overpressure valve, flow limiter, and a closable extraction valve (Manual or Electrical), and valid approval/certification.
The mentioned safety features come in different versions, such as:
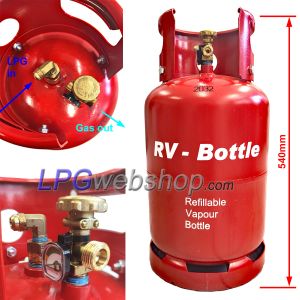
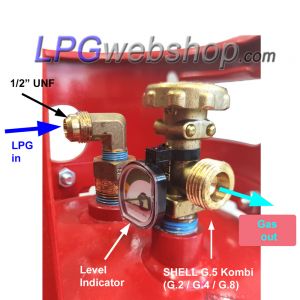
- with a separate 80% fill valve and a separate manual extraction valve with integrated overpressure valve (like on the RV gas bottle),
- one with everything in one single integrated hand valve (like OPD gas bottles) or
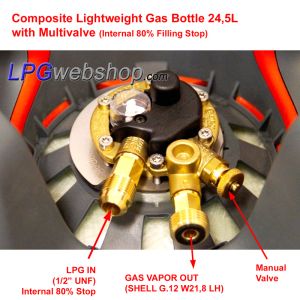
- a MultiValve with integrated separate 80% fill valve connection, separate extraction valve with connection, and overpressure valve.
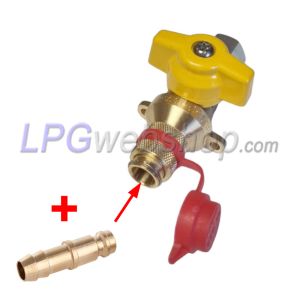
The advantage of an LPG gas bottle with connections and valves like type A and C (i.e., with separate connections for the inlet and outlet) is that the filler hose can remain connected to the inlet and a pressure regulator or high-pressure gas hose can remain connected to the outlet, so that during refueling, the filler hose and high-pressure hose do not need to be swapped. Therefore, the use of an OPD gas bottle (type B) is strongly discouraged for internal use in a RV camper, caravan, or food truck. An OPD gas bottle (type B) may be better suited as an external LPG gas bottle. It can be connected to the LPG system via a high-pressure quick connector. First, study the regulations carefully to determine if this is possible for your RV camper or caravan.
If you decide to use a refillable LPG gas bottle in your RV camper, caravan, or food truck, then this LPG gas bottle must comply with the mentioned safety requirements and be equipped with valid approval/certification. But also, the securing of the LPG gas bottle and the entire LPG installation must comply with the correct safety requirements and approvals. (Later in this article, we write more about this).
For more information regarding LPG gas bottles and their mounting and securing, we refer to our tutorial: LPG gas bottles.
Examples of LPG gas bottles


LPG Gas Tank
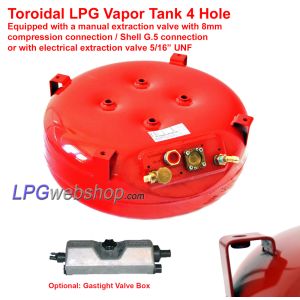
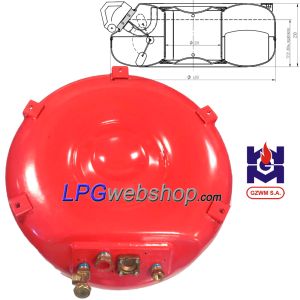
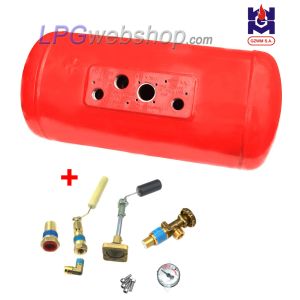
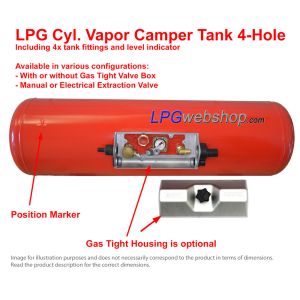
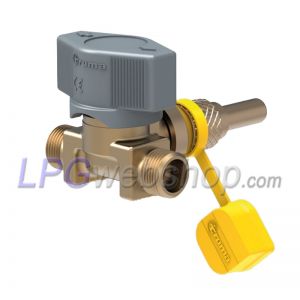
This component stores the liquid LPG and also vaporizes it so that the gas leaves the gas tank in gaseous form. LPG vapor tanks also come in different shapes, dimensions, sizes, and variants. For example, LPG vapor tanks exist in cylindrical shape or in the shape of a ring (toroidal) or wheel. Both types are placed horizontally in or under the vehicle. Most LPG vapor tanks are so-called red 4-hole gas tanks, meaning they are equipped with 4 holes/valves, each with its own function, such as filling with an 80% fill valve with non-return valve, an overpressure valve, content measurement, and an extraction valve with flow limiter that can be opened and closed (manual/electrical). The red color distinguishes them from LPG tanks intended for powering a vehicle on LPG, which have a black color and supply LPG in liquid form to the LPG system.
LPG gas tanks must be equipped with UNECE 67R approval, which makes it possible to use them in a (recreational) vehicle and to refuel. This is a strict and very safe ECE directive for LPG components for automotive applications. LPG vapor tanks always come with separate inlet and outlet.
To learn more about this, we refer to the related article on Vapor Tanks: LPG Vapor Tanks for Campers, Caravans and Foodtrucks
Examples of LPG gas tanks


Note when using 2 gas tanks (or gas bottles)!:
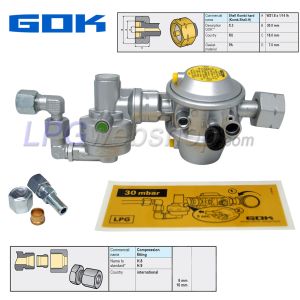
When using 2 LPG gas bottles or 2 LPG vapor tanks, the outlets of the gas tanks must not be directly connected to each other. It must be technically impossible for gas to flow from gas tank A to gas tank B. For this, a changeover device is used that ensures the gas bottles are never interconnected and automatically prevents gas from escaping if one of the two gas bottles is not connected. Pressure regulators intended for the use of 2 gas bottles are usually equipped with such a changeover device.
Note when using an EXTERNAL gas bottle or gas tank!:
- Vehicles with a gas bottle compartment with internal access may not use an external gas supply (gas bottle or gas tank).
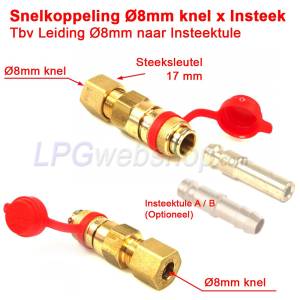
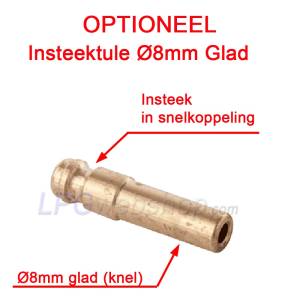
- When using an insertion coupling (high-pressure quick connector) for connecting an external gas supply (gas bottle or gas tank) alongside the use of an internal existing gas source (gas bottle or gas tank), it will be permanently fixed, and a changeover device, as mentioned above, will be applied.
- Such an insertion coupling (high-pressure quick connector) will be installed in the gas bottle/gas tank compartment or externally on the wall of the compartment.
- If this insertion coupling (high-pressure quick connector) is installed in the gas bottle/gas tank compartment, it must be possible to connect an external gas supply and then close the compartment again without causing any damage to the supply gas hose.
- The supply pressure from the external gas source will not be lower than 0.3 bar and not higher than 2.2 bar. The insertion coupling (high-pressure quick connector) will be provided with a permanently attached label or sticker on which this minimum and maximum inlet pressure are indicated. For the use of an automatic changeover device, a minimum pressure of 1.0 bar is recommended.
- The insertion coupling (high-pressure quick connector) will be incompatible with any low-pressure quick connector (gas extraction insertion coupling).
- The insertion coupling (high-pressure quick connector) will be protected against dirt and water by using a cover.
Ensure proper securing of the LPG gas bottle or LPG gas tank.
An LPG gas tank or LPG gas bottle in a vehicle such as a RV Camper, caravan and Food Truck must, of course, be securely fastened so that it cannot come loose and move while driving or in the event of a possible collision. Therefore, ensure it is attached to the vehicle with a sturdy construction. The EN 1949 guideline and the G 607 regulation indicate how an exchangeable LPG gas bottle should be secured in a vehicle. Refillable LPG gas bottles and LPG gas tanks that are refueled while in the recreational vehicle must be permanently fixed and connected in the vehicle according to the installation requirements in EN 12979 (or applicable national guidelines such as the RDW LPG installation guidelines in the NL). The exact method of securing depends on the size of the LPG gas tank or LPG gas bottle and the positioning (underfloor or internal mounting, etc.).
Here we mention a few basic requirements:
- LPG Gas Bottles and LPG gas tanks must be firmly secured in the vehicle so that they remain in their position while driving or in an accident.
- The method of securing an LPG gas bottle depends on whether it is used as an exchangeable or as a refillable LPG gas bottle. For exchangeable LPG gas bottles, the securing must be openable without tools. While for refillable LPG gas bottles, they must be permanently secured and connected.
- Always place an LPG gas bottle upright (with the valve at the top) so that the valves on the tank function correctly and only gas in gaseous form leaves the gas bottle.
- Position an LPG tank in the correct position as indicated by the manufacturer so that it is only possible to take LPG in gaseous form. Most LPG tanks are marked on the tank indicating what the central horizontal plane of the tank is and what the top side is.
- See further the safety requirements and regulations mentioned earlier in this article.
For mounting LPG gas tanks, we essentially have 3 mounting systems available in our webshop. 1; via a tank frame and tension straps that clamp the tank onto the frame, 2; via mounting rings that clamp around the tank and can be welded to an iron angled strip, to attach the whole to the vehicle, and 3; via mounting brackets that also clamp around a tank and can be attached to the vehicle via a foot on the bracket. These mounting systems are available in different sizes so that they are available for most tank sizes.
Read more about this in our tutorial Installation Instructions for LPG Cylinder Tanks (Vapor Tanks) in Vehicles
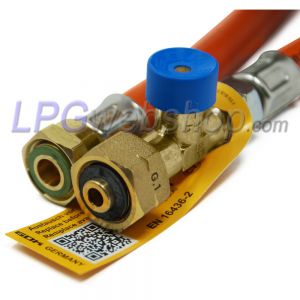
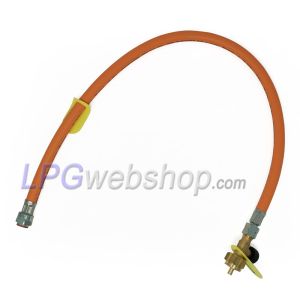
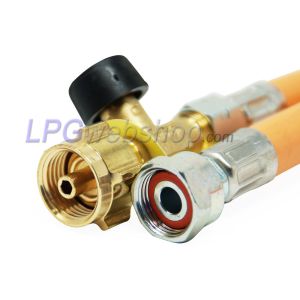
High-Pressure Gas Hose
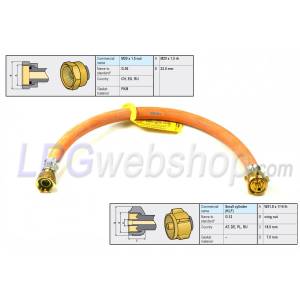
This component makes a connection between, on one side, the outlet of the gas bottle and, on the other side, the inlet of the pressure regulator. This high-pressure hose is used if the pressure regulator is not connected directly to the outlet of the gas bottle but is mounted, for example, against the wall or floor of the vehicle. Since this type of gas hose is directly connected to the gas bottle, it must withstand high gas pressure (max 30 bar) and comply with the requirements of EN 16436 Class 3.
A high-pressure gas hose must not be longer than 45 cm, (and according to DVGW G607,) except if the gas bottle(s) are on a pull-out tray to be able to pull the gas bottle(s) somewhat outside the camper to improve the operation of the gas bottle(s) and the pressure regulator is not mounted on this pull-out part but on the fixed part of the vehicle such as, for example, the rear wall. In the latter case, the maximum length of the high-pressure gas hose may not be more than 75 cm.
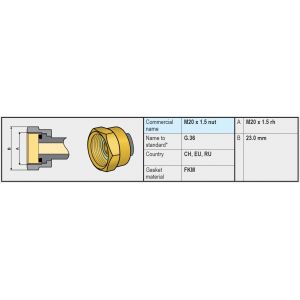
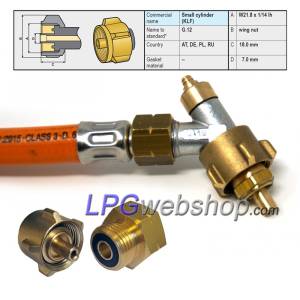
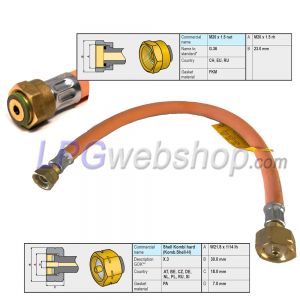
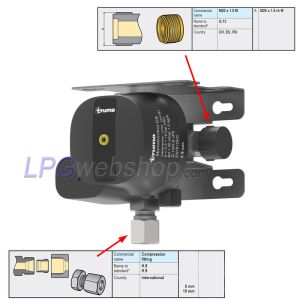
A high-pressure gas hose must be equipped with fixed couplings on both sides. For this, different types of couplings are conceivable on the inlet (e.g., G.1 / G.2 / G.4 / G.8 / G.12) depending on the connection on the gas bottle and the country of application. And on the other side (outlet side), a high-pressure gas hose is usually equipped with an M20 x 1.5 (G.36) connection, making it suitable for connection to pressure regulators with a (G.13) Male M20 x 1.5 connection on the inlet.
Optionally, a high-pressure gas hose can be equipped with a hose rupture valve, which, in the event of a rupture, ensures that the gas supply stops.
Most important safety requirements regarding the installation of high-pressure gas hoses:
- A high-pressure gas hose will, by means of proper placement, be protected against mechanical stress, mechanical damage, and overheating.
- A high-pressure gas hose will be well accessible and reachable and will not be placed through or behind walls, above ceilings, or under floors.
- A high-pressure gas hose will continuously rise (run upward) over its entire length from the connection on the LPG gas bottle to the connection on the pressure regulator. This is to prevent liquid LPG from accidentally entering the pressure regulator.
- A high-pressure gas hose will be designed and mounted in such a way that it cannot accidentally come loose and is not under mechanical stress.
- In the case of gas consumption (heating) while driving, the high-pressure gas hose must be equipped with a hose rupture valve on the inlet side (Directive ECE R122 annex 8).
High-Pressure Gas Filter
We advise using a gas filter between the gas bottle / LPG vapor tank and the inlet of the pressure regulator. (Do NOT place this downstream of a pressure regulator.) This type of filter is often used in RV Campers or Caravans to capture paraffin (fats and oils) and any other contamination in liquid form or particles in solid form (e.g., sand or iron) and thus prevent them from entering the pressure regulator and the rest of the system. This type of filter is in some cases connected directly to the outlet of a gas tank or gas bottle and is then usually equipped with, on one side, a female and, on the other side, a male (G.1 / G.2 / G.4 / G.8 / G.12) connection, so a pressure regulator with such a same connection can be connected directly onto it. Or otherwise a high-pressure gas hose. There are also high-pressure gas filters with M20 male and female connections (G.13 and G.36) that are connected directly to the inlet of the pressure regulator. In that case, a high-pressure gas hose is placed between the gas bottle and this high-pressure gas filter.
Examples of high pressure gas hoses and high pressure filters


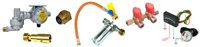
Pressure Regulator, why is it needed?
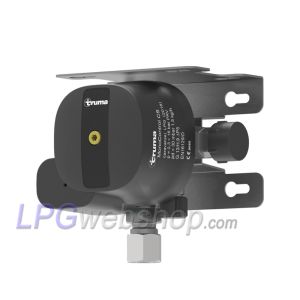
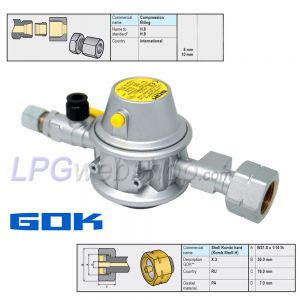
A pressure regulator is connected (with or without the interposition of a high-pressure gas filter and/or high-pressure hose) to the outlet of an LPG vapor tank or gas bottle, with the aim of reducing and regulating the pressure to a low stable and safe working pressure of, in most cases, 30 mbar. This pressure reduction is necessary because the pressure coming from the gas tank/gas bottle is much too high. The pressure in a gas tank/gas bottle varies, depending on temperature, between 1 and 20 bar. This pressure is MUCH too high for gas appliances, such as a gas stove or heater in your recreational vehicle. Therefore, it is necessary to reduce the pressure to a constant, safe low pressure. The current mandatory working pressure for gas systems in recreational vehicles is 30 mbar. (Older LPG systems or in other applications such as food trucks or static caravans sometimes use a working pressure of 50 mbar and sometimes also 39 mbar).
Pressure regulators come in many variations with different connections and outlet pressures and different optional accessories.
Pressure regulators can be connected in the following ways:
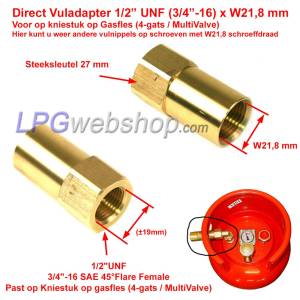
- Directly connected to the gas bottle (gas tank). Usually via a female coupling with left-hand thread W21.8 of the type / G.2 / G.4 / G.5 / G.8 / G.12 or (in a number of countries such as Italy) a female coupling with a slightly smaller left-hand thread, namely W20 of the type G.1). A low-pressure gas hose (EN 16436 Class 2) is connected to the outlet of the pressure regulator with a maximum length of 45cm. This low-pressure gas hose then connects to the rigid fixed gas pipe in the vehicle.
- Remotely connected to the gas bottle valve and mounted on the wall of the gas bottle compartment. The connection between the gas bottle and pressure regulator is made by means of the previously discussed high-pressure gas hose with a maximum length of 45cm. The inlet of the pressure regulator is usually equipped with a G.13 connection (male M20 thread). The outlet of the pressure regulator is then connected to the rigid fixed gas pipe in the vehicle.
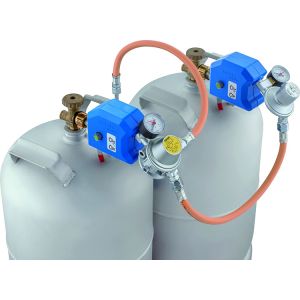
- Like b, but with 2 gas bottles. The inlet of the pressure regulator is equipped with 2 connections (G.13) and a changeover device that ensures the gas bottles are never interconnected and automatically prevents gas from escaping if one of the two gas bottles is not connected.
- Remotely connected to the gas bottle valve (or 2 gas bottles) and mounted on the wall of a pull-out tray in the gas bottle compartment, on which the gas bottle(s) and fixed pipe are also mounted. (Gas bottle(s), high-pressure gas hoses, pressure regulator, and partly fixed gas pipe are thus mounted together on this pull-out tray.) The connection between the gas bottle(s) and pressure regulator is made by means of the previously discussed high-pressure gas hose with a maximum length of 45cm. The inlet of the pressure regulator is usually equipped with G.13 connection(s) (male M20 thread). The outlet of the pressure regulator is then connected to the rigid fixed gas pipe on the pull-out tray. To connect the gas pipe on the pull-out tray to the rest of the fixed gas pipe in the vehicle, a low-pressure gas hose (EN 16436 Class 2 or Class 3) with a maximum length of 75cm is used. In the case of 2 gas bottle connections on the pressure regulator, a previously mentioned changeover device must be used.
- As in a directly connected to the gas bottle (gas tank). However, with the gas bottle on a pull-out tray in the gas bottle compartment. A low-pressure gas hose (EN 16436 Class 2 or class 3) is connected to the outlet of the pressure regulator with a maximum length of 75cm. This low-pressure gas hose then connects to the rigid fixed gas pipe in the vehicle.
Specific safety requirements when using a pull-out tray.
- The LPG installation on a pull-out tray will be connected to the fixed gas pipe in the vehicle by means of a flexible gas hose with approval EN 16436-2 class2 (for low pressure) or Class 3 (for high pressure).
- An always good and easily accessible shut-off valve will be permanently placed in the supply line not more than 50cm upstream of the gas hose connection.
- A flow limiter will be applied directly upstream of the gas hose.
- The gas hose will be protected against mechanical stress and damage, and overheating by means of proper placement.
- The gas hose will be well and easily accessible and will not be placed through or behind walls, above ceilings, or under floors.
- Downstream of a low-pressure gas hose, it will be connected to the fixed gas pipe in the vehicle.
Most important safety requirements regarding pressure regulators and their installation:
- The pressure regulator must comply with the standard EN 16129.
- The working pressure of a gas system for recreational and domestic use in a RV camper or caravan will not be adjustable and will be 30 mbar.
- The flow capacity of a gas system for recreational and domestic use in a RV camper or caravan must never exceed 1.5 kg/h. For this reason, use a pressure regulator with a flow capacity of a maximum of 1.5 kg/h.
- In the case of using a gas bottle in a gas bottle compartment, the pressure regulator will be used in this compartment.
- The pressure regulator must be equipped with a test connection on the outlet for performing a mandatory leak test of the LPG system downstream of the pressure regulator.
- Where the pressure regulator is not mounted on the gas bottle valve, it will be mounted on the wall of the gas bottle compartment or on the pull-out tray.
- In the case of using an LPG gas tank, the pressure regulator will be fixed directly to the tank extraction valve.
- Where the pressure regulator is installed on the outside of the vehicle without a housing (e.g., mounted directly on the outlet of a gas tank in an underfloor situation), the overpressure valve (and optionally the test connection) will be protected against dirt and water.
- If the LPG heating system or another gas appliance is intended to be used while driving the vehicle, it must be prevented that gas (LPG) can escape uncontrollably due to an interruption of the gas system in an accident (see UNECE R122 annex 8). In this case, use a pressure regulator with a crash sensor (and use, in the case where it is not mounted directly on the gas bottle valve or tank valve, a high-pressure gas hose with a hose rupture valve).
Read more about pressure regulators and pressure reduction in this article: Pressure Regulators for Gas Bottles and Vapor Tanks


Low-Pressure Line
After the pressure has been reduced and regulated to 30/50 mbar by a pressure regulator, the gas can be transported and distributed to the gas appliances, such as a cooking appliance, BBQ, or heater. This section is called the "Low-Pressure Line" and can, depending on the application, be very simple to somewhat more extensive. For this, rigid gas pipe should mainly be used and may partly consist of flexible gas hose, but only where explicitly permitted. But also, the various (quick) connectors, distribution pieces, and quick-closing valves fall under the low-pressure line. These components are further discussed below in this article.
The low-pressure line must be permanently identified with the working pressure indicated in mbar using a label in the vicinity of where the low-pressure line is connected to the pressure regulator.
An overpressure valve (or more) will be installed in the low-pressure line (for example, integrated into the pressure regulator) to prevent a pressure higher than 150mbar from being supplied to the gas appliances. Where such an overpressure valve is placed, it will discharge into the gas bottle/tank compartment or directly to the outside air, but not near:
- a fan for the living space
- an opening part of a window
- an exhaust flue
- a heat source such as an exhaust.
Rigid Gas Pipe (Low Pressure)
For rigid gas pipe in the low-pressure line, copper pipe with an outer diameter of 8mm is usually used. But sometimes with a diameter of 10mm if more flow capacity is needed. Copper gas pipe must comply with the standard EN 1057. The wall thickness of 8mm (outer diameter) copper pipe must be at least 0.8mm, and for 10mm copper pipe, this is 1mm.
Furthermore, the rigid gas pipe may also be made of steel or stainless steel, and comply with the standards EN 10305 and EN ISO 1127, respectively. Steel or stainless steel is used less often due to the fact that it is very difficult to bend and install.
It is not permitted to use other materials for the rigid gas pipe.
These are the most important safety requirements regarding the rigid gas pipe and its installation:
- The gas pipe will be protected against mechanical damage, either by means of positioning or by means of other means such as, for example, grommets.
- The gas pipe must be protected against corrosion, for example, by using plastic sleeves, a bitumen layer, or another anti-corrosive material.
- The gas pipe will be installed free of mechanical stress.
- The gas pipe will be dimensioned accordingly (i.e., use of the correct diameter) so that the pressure drop in the gas pipe from the pressure regulator to the gas appliance does not cause the pressure at the inlet of the gas appliance to fall below the minimum acceptable pressure. This must be tested by having the pressure regulator operate at the minimum required working pressure for the gas appliances and having all installed gas appliances operate simultaneously at maximum capacity. The pressure drop in the gas pipe increases with longer lengths, a limited diameter, and increasing gas flow.
- Where the gas pipe is installed near electrical wiring, contact with the electrical wiring will be prevented by means of distance, insulation, or shielding. Where no protective means is applied, a minimum distance between gas pipe and electrical wiring must be present: 30mm in the case where they run parallel or 10mm for crossing pipes.
- The gas pipe may not make contact with any other system.
- If it is difficult to distinguish the gas pipe from pipes of other systems, the gas pipe will be clearly and permanently identified.
- Steel or stainless steel gas pipe will be attached to the vehicle by means of fixing clamps with a maximum spacing of 100cm.
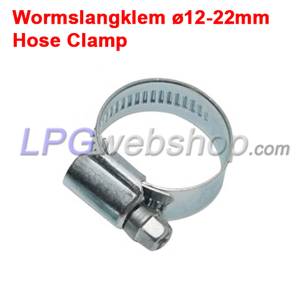
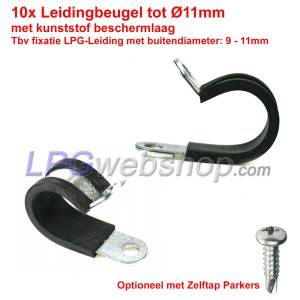
- Copper gas pipe will be attached to the vehicle by means of fixing clamps with a maximum spacing of 50cm.
- These fixing clamps will be suitable for this task and designed in such a way that they minimize wear and vibration and prevent electrolytic corrosion.
- For gas appliances that produce vibrations, such as a generator, measures will be taken to prevent these vibrations from being transmitted to the rigid gas pipe, for example, by using a flexible gas hose between the appliance and the gas pipe.
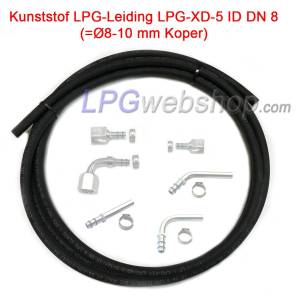
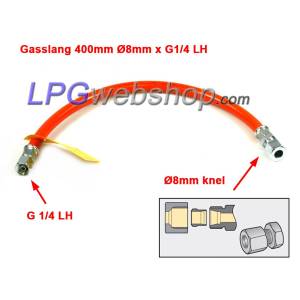
Flexible Gas Hose (Low Pressure)
Flexible gas hose looks like an orange rubber or plastic gas hose and is usually only used to bridge short distances between, for example, a movable gas appliance or a gas appliance that causes vibrations (e.g., a generator) and the rigid gas pipe, or, for example, in the case of a pull-out tray in the gas bottle compartment, and must comply with the requirements of EN 16436 Class 2 (or otherwise class 3).
These are the most important safety requirements regarding flexible gas hose and its installation in the low-pressure line:
- The length of the gas hose will be as short as possible and not exceed 75cm.
- In the case where the flexible gas hose is used for the connection between a gas appliance and the rigid gas pipe, a shut-off valve and a flow limiter will be installed directly before the gas hose.
- The gas hose will be protected against mechanical stress and damage, and overheating by means of proper placement.
- The gas hose will be well and easily accessible and will not be placed through or behind walls, above ceilings, or under floors.
- Downstream of a low-pressure gas hose, it will be connected to the rigid gas pipe or a gas appliance.
Examples of gas pipe and low-pressure gas hose

Connectors and Quick Connectors
Connectors that may be used to connect gas pipe and gas hose to other components such as a gas bottle, pressure regulator, shut-off valve, gas appliance, or another gas pipe or gas hose.
These are the most important safety requirements regarding connectors and fittings in an LPG installation in a recreational vehicle:
- Connectors that use a rubber or plastic seal may only be used for connections on the gas bottle (or gas tank) and pressure regulator system (High-pressure hose, high-pressure filter, changeover device, and pressure regulator).
- Plastic connectors may not be used.
- Only the following types of connectors may be used:
- Cutting ring fitting and must comply with EN ISO 8434-1
- capillary fitting (coupling) and will comply with EN 1254-1 and done by hard soldering.
- Flared type fitting and will comply with ISO 8434-2
- Compression ring fitting and will comply with EN 1254-2
- Threaded fitting and will comply with EN 1254-4 or EN 10226-1
- Jointing materials will comply with EN 751-2, be suitable for use with LPG, and in accordance with the manufacturer's instructions. Such jointing materials will only be applied to male thread(ed connections). PTFE tape must comply with EN 751-3 and be used according to the manufacturer's instructions.
- Jointing materials will not be applied to other couplings.
- All connections will be made in such a way that no unnecessary mechanical stress arises in the coupling and gas pipe.
- Components, assemblies, and gas appliances that are likely to be disconnected from the gas line for routine maintenance will only be connected by means of mechanical couplings, compression ring fittings, Cutting ring fittings, or insertion couplings (quick connector) with integrated shut-off valve that closes upon disconnection.
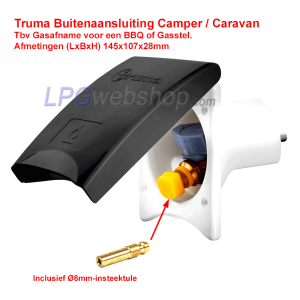
- In the case of external use of a gas appliance (e.g., a BBQ), an external insertion coupling (low-pressure quick connector) will be installed (e.g., integrated into the bodywork), to which a gas hose, complying with EN 16436 Class 2 (or otherwise class 3), can be connected. Such an external insertion coupling (low-pressure quick connector) will be equipped with a shut-off valve that automatically closes upon disconnection. Disconnection will only be possible after closing a manual shut-off valve. Opening this manual shut-off valve will only be possible if a gas hose is connected to the insertion coupling.
- An external insertion coupling (low-pressure quick connector) may only be used for gas extraction. Under no circumstances may gas be supplied via this connection. For this reason, an external insertion coupling must not be compatible with a filling coupling.
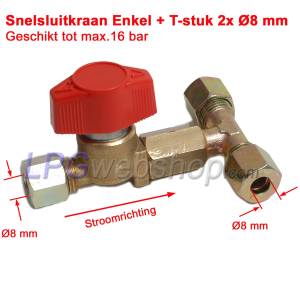
Examples of couplings, T-pieces and low-pressure quick couplings


Shut-off Valves and Quick-Closing Valves:
Various shut-off valves and taps need to be used in an LPG installation to make the system safe and usable. The valves themselves and their installation must comply with strict safety requirements.
These are the most important safety requirements regarding shut-off valves in an LPG installation in recreational vehicles:
- Shut-off valves must have a clear "open" and "closed" identification marking. They must also comply with the tightness requirements of EN 331:2015.
- It must not be possible to unintentionally switch the shut-off valve to the "open" position.
- If a shut-off valve is operated by turning, the "closed" state will be 90° rotated relative to the "open" position.
- An LPG installation will have a main shut-off valve, which is well and easily accessible, preferably in the gas bottle/gas tank compartment.
- Instead of using a main shut-off valve, the shut-off valve on the gas tank and/or gas bottle also suffices when using a maximum of 2 units. These shut-off valves will be located in the same environment, be well and easily accessible, and preferably in the gas bottle/gas tank compartment.
- Each gas appliance will be provided with its own (manual) shut-off valve in the supply line and as close as possible to the gas appliance.
- Each (manual) shut-off valve or control knob will be well and easily accessible and will be provided with unmistakable identification (sticker) for which gas appliance it is intended. (Preferably use the standard labels as in EN 1949).
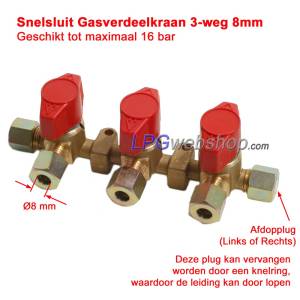
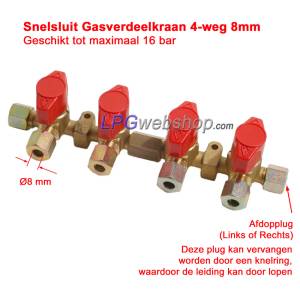
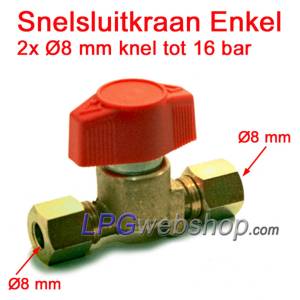
Examples of shut-off valves, quick-acting valves, distribution valves

This article is copyright protected. Copying (partially) this article is punishable.
Disclaimer
The information in this article is intended solely as a guide and has been attempted to be aligned as well as possible with the applicable regulations and guidelines. National regulations may deviate from this or impose additional requirements. Installers and users are themselves responsible for (having) the gas installation checked and complying with applicable local laws and regulations. Always consult a certified professional for this.
Despite the care with which this information has been compiled, there may be errors and omissions. No rights can be derived from this article. The most recent and local official standards and regulations are always leading.
In addition to this specific disclaimer, our general disclaimer also applies, the link to which can be found in the menu in the footer (page end).