


Introduction
This article provides the most important information for the installation of a cylindrical LPG tank using assembly materials available in our webshop, based on applicable guidelines and regulations. Furthermore, practical examples of mounting methods accompanied by explanations are given in this document.
The following related tutorials complement this article:
LPG Vapor Tanks for RV Campers, Caravans and Food Trucks
LPG installation in a recreational vehicle like a RV Camper, Caravan or Food Truck
Pressure Regulators for Gas Bottles and Vapor Tanks
The EN 1949 Standard: The European Standard for Safe LPG Systems in RVs and Caravans
What is an LPG Gas Bottle and what different types are there?
Introduction to LPG Tank Installation
There are many different types of LPG tanks, each with different dimensions. This is not without reason, as there is an even greater variety of vehicles with different shapes and sizes. Therefore, it is important that the LPG tank and the vehicle are a good match and that the LPG tank has the right dimensions to be properly installed in or under the vehicle. Given this large variation on the one hand of LPG tanks and on the other hand of vehicles, it is impossible to provide specific instructions for every combined variant.
Main Rule: Have the LPG tank installed by a certified LPG specialist!
Adhere to and respect the safety requirements of guideline EN 12979 (or in the Netherlands the RDW LPG installation requirements)
Follow the applicable guidelines in directive EN 12979 (or for the Netherlands the RDW LPG installation requirements) for the installation and securing of LPG tanks as fuel for propulsion and for domestic use such as heating and cooking in leisure vehicles such as RV campers (motorhomes), caravans, and food trucks. These guidelines are leading!
Primary general LPG tank installation instructions:
The instructions below apply to all types of LPG tanks and/or types of placement (unless specifically indicated otherwise).
- The LPG tank must be permanently installed in the vehicle.
- The LPG tank must not be affected by corrosion.
- The LPG tank must not be placed in the engine compartment.
- The LPG tank must remain accessible for inspection, replacement, and operation of the shut-off valve.
- The LPG tank must not be placed near a heat source. (minimum distance of 10cm). If the distance is less than 10cm, a heat shield must be placed.
- The LPG tank must not make metallic contact with the vehicle.
- The LPG tank must be approved according to the R67-01 regulation and provided with an approval number.*
- No welding or drilling may be performed on the LPG tank.
- The LPG tank must be properly secured (the securing method depends on the type of tank, location in the vehicle, and the tank capacity.)
- Securing materials must be resistant to corrosion and other environmental conditions.
- In the case of an LPG internal installation, the LPG tank must be provided with a gas-tight housing / cover and equipped with ventilation to the outside of the vehicle using a bottom vent with sufficient passage.
- In the case of an LPG underfloor mounting, there must be a minimum distance of 20cm between the LPG tank and the road surface.
* LPG tanks are provided with an R67-01 approval. This approval number is marked on the tank and must remain visible after installation. Newly supplied LPG tanks come with a tank certificate containing the manufacturing data of the tank. (This certificate is either directly affixed to the tank or on the packaging box). Do not lose this document.
TIP! In the case of underfloor mounting; during installation, apply a protective coating (underbody coating) to the LPG tank for a longer lifespan of the tank. Afterwards, clean the tank of sand, dust, and grime each year, dry it, and then apply a new layer of protective coating.
TIP! When filling the gas tank for the first time
In addition to a mandatory leak test, it is advisable to check the gas tank and connections (such as the valves on the tank, the filling hose, and filling connection) extra carefully for any leaks before filling the gas tank with LPG. To pressurize the gas tank, you can simply connect the refueling nozzle from the LPG pump station to your filling connection (without activating the pump). This causes a limited amount of LPG from the refueling nozzle and hose to flow into the gas tank, as it is still pressure-free. This limited amount of LPG vaporizes in the gas tank and thereby builds up a gas pressure in the gas tank that is sufficient to detect any leaks. LPG also has a strong odor, so a leak should also be noticeable because of that. Check carefully for leaks with a gas leak detection spray (or as an alternative a plant sprayer with soapy water) and spray it on the various couplings and connections. Only when you know that everything is leak-free and properly connected is it possible to fill the tank further.
Optional use of a Gas-tight housing
A gas-tight housing is used to protect the tank valves / accessories and, in the case of internal installation, to collect any gases from the overpressure valve on the LPG tank and then discharge them via a ventilation hose and bottom vent (floor penetration) to the outside. A gas-tight housing is certainly required if the LPG tank is placed inside the vehicle's interior and must be sealed gas-tight using the supplied rubbers. A gas-tight housing is not strictly necessary if the LPG tank is placed in an exterior space (for example with underfloor mounting) or in a ventilated space (which is sealed off from the rest of the vehicle). However, it is always necessary to protect the tank valves / accessories from dirt and water.
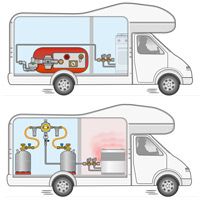
Placement of gas tank in the Interior / Exterior:
In the case where a gas tank is placed inside the vehicle (internal installation), it is necessary to equip the gas tank with a gas-tight housing, a ventilation hose, and a bottom vent (floor penetration) for discharging any gases to the outside.
A gas-tight housing in combination with a manual valve is not always easy to make gas-tight....
When using a Hand valve with SHELL connection Male G.5 Kombi (G.2/G.4/G.8) (W21.8x1/14 Left-hand thread), it is NOT possible to properly seal the gas-tight housing, meaning this combination is essentially only suitable for underfloor mounting or, in the case of internal installation (interior), this can only be done in a ventilated space that is sealed off from the rest of the vehicle.
When using a hand valve with an 8mm compression fitting that is directly facing outward, the gas-tight housing also CANNOT be properly sealed, as there is not enough space to place a gas-tight plastic sealing boot.
In the case of a hand valve with an 8mm compression fitting, the gas-tight housing can be sealed gas-tight if the hand valve is oriented with its outlet facing inward. (The gas line can then be looped inside the gas-tight housing or exit the housing on the same side as the filling hose).
Installation instructions for LPG Cylinder Tanks and Cylinder Vapor Tanks
Pay attention to the correct positioning of a cylinder tank for proper operation.
A cylinder tank must be placed horizontally and turned at the correct angle so that the gas extraction and the 80% fill valve of the tank function correctly.
On an LPG cylinder tank for propulsion (liquid extraction), the tank valves are at an angle of 52 degrees relative to a central vertical line. The tank valves thus protrude somewhat above the central horizontal plane of the tank. See the example below of an LPG Cylinder Tank.
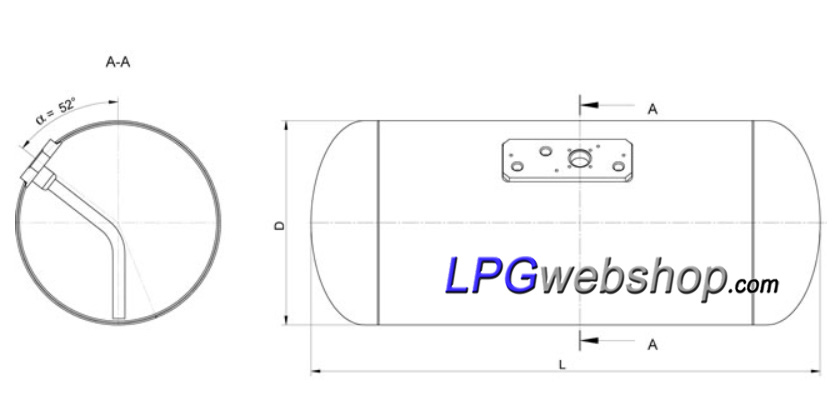
On the gas tanks, the center is indicated by a cross with an arrow pointing upward. Sometimes this cross is indicated with a sticker, and in other cases, a shape is embossed in the tank.

In the case of a vapor tank, this angle is 105 degrees, and the appendages are located below the horizontal midplane of the tank.

Securing of LPG Cylinder Tanks and Cylinder-shaped Vapor Tanks
Cylinder tanks can be secured using one of the following methods:
- Mounting using a Tank Frame and Tank Straps
- Mounting using Tank Mounting Brackets with Foot
- Mounting using Mounting Rings welded to Angle Iron
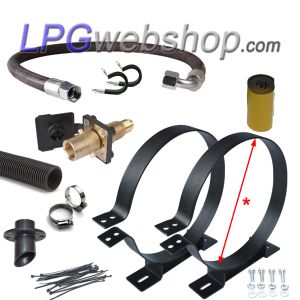
Examples of mounting materials for cylinder tanks


Below we elaborate on each method:
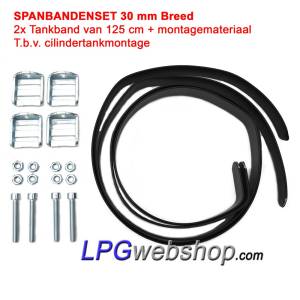
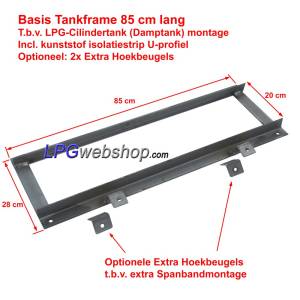
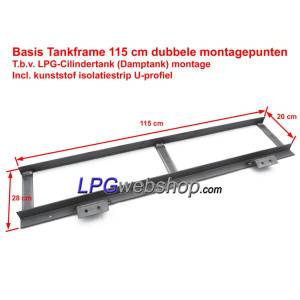
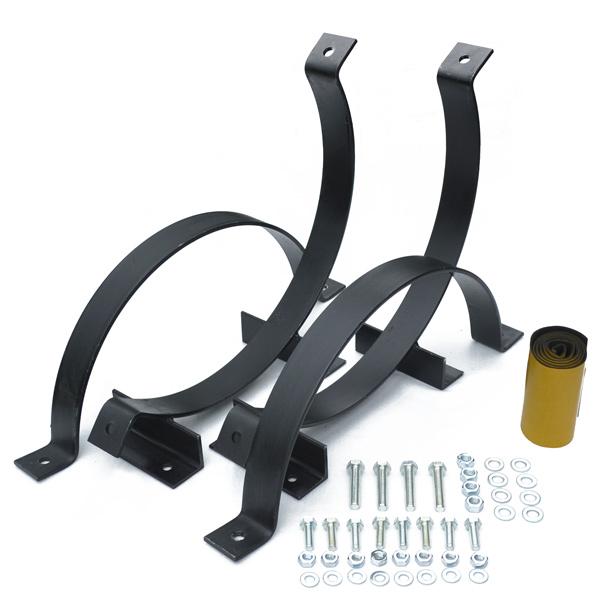
Basic Instructions for LPG Cylinder Tank Mounting using a Tank Frame and Tank Straps
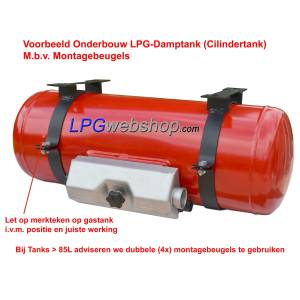
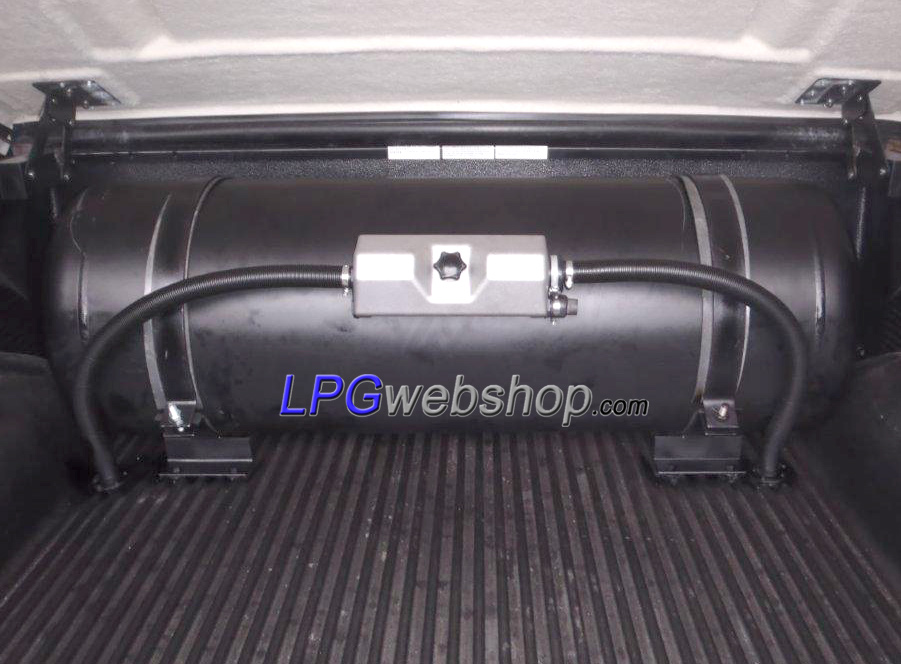
A tank frame / tank rack is used in combination with tank straps for securing an LPG Cylinder Tank (LPG vapor tank) with a tank diameter of minimum 270 mm up to maximum 400 mm. (Gas tanks with a diameter smaller than 27 cm will fall between the beams). The weld seams of the tank must fall within the length of the tank frame. As a rule of thumb, you can determine the length between the weld seams by subtracting approximately 10 cm from the total tank length. The tank straps must prevent the LPG tank from sliding, rotating, or coming loose. If the tank is placed in the direction of travel, use an end plate on the tank frame to prevent the tank from sliding through.
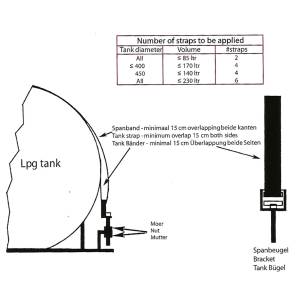
For tanks larger than 85L, it is necessary to use double tank straps. This means at least 4 tank straps in total.
This securing method is NOT suitable for gas tanks larger than 150L. For these, special tank mounting brackets are needed (see mounting using Tank Brackets with foot). In the case of underfloor mounting of tanks larger than 80L, we advise NOT to secure them using a tank frame and straps, but using mounting rings or mounting brackets.
- Secure the tank frame in the predetermined location with a sufficient number of bolts of the correct quality to a sufficiently strong structure. The tank frame must be secured to the vehicle floor with a minimum number of bolts of minimum size and quality. These values depend on the size of the tank and the (national) regulations. (EN 12979 / RDW installation methods).
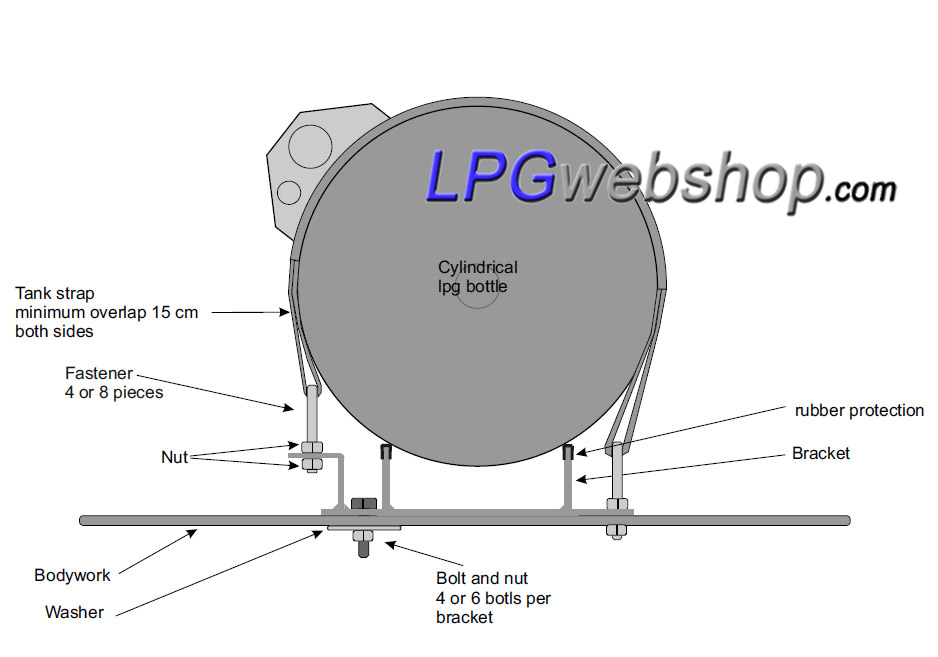
- The gas tank must not make metal-to-metal contact with the tank frame. Therefore, use plastic or rubber insulation material (U-profile). Place the insulation material on the tank frame so that the tank makes no metallic contact with the frame.
- Position the gas tank on the prepared tank frame. Pay attention to the marking (cross with arrow) on the gas tank for correct positioning to ensure proper operation of the gas tank. The marking indicates the top side and the horizontal central plane.
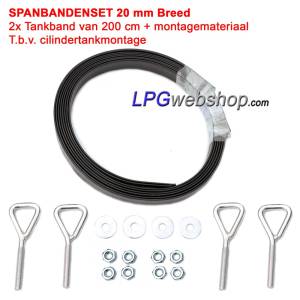
- Use tank straps (as shown in the images below) to secure the tank to the tank frame. The tank straps run over the tank and are passed through a bracket on each side (from outside to inside). The ends of the tank straps have a minimum overlap of 15cm (preferably more) on both sides and go back under the same tank strap, thus being clamped between the tank and the strap itself. Ensure the tank straps are tightened firmly and that the tank is pressed firmly and without play onto the tank frame.
- No weakening may be introduced into the tank straps, for example by drilling a hole. The attachment of the tank straps may only be done using the designated and supplied strap brackets.
- The tank strap brackets are attached to the tank frame. On one side (usually the rear), the bracket is attached to the tank frame and the vehicle floor plate. (Start with this side). On the other side of the tank frame, the bracket is mounted to a specifically higher mounting point, which allows the tank straps to be tensioned by tightening the nuts. Do not forget to secure using the second nut.
- The LPG tank must be secured to the tank frame with at least two tank straps. If the tank straps also bear the weight of the LPG tank (i.e., the tank does not lie on the tank frame but hangs in the tank straps; underfloor mounting), then at least 3 tank straps must be installed. However, we advise using at least 4 in that case, so the tank is symmetrically secured. The precise number of tank straps to be used depends, among other things, on the tank capacity and the positioning of the LPG tank. Furthermore, adhere to and respect the national regulations for a correct installation. (EN 12979 / RDW installation methods).
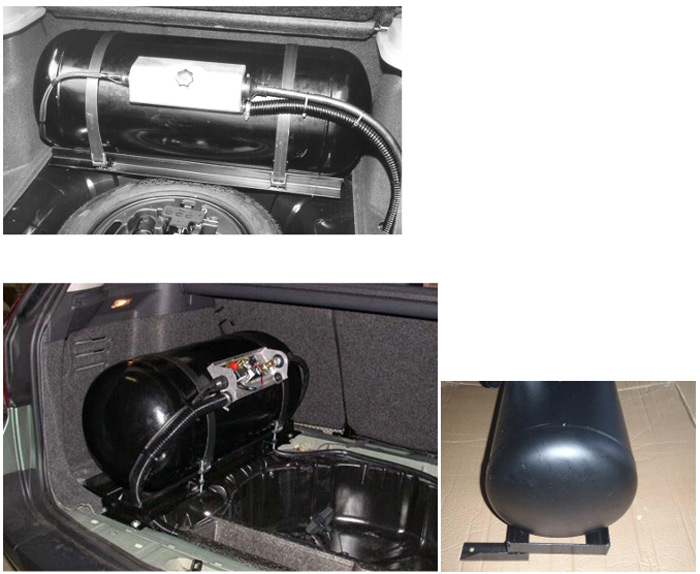
- In the case of a fold-down rear seat, the tank can, for example, be installed lengthwise on the left or right side in the luggage compartment. The tank frame must then be equipped with an additional component, a raised cross member at the front of the frame (head piece) to prevent the tank from sliding off the frame in the event of a collision. And there must be a total free space of 10 cm between the tank and the seat back and the rear of the car.
Below are some illustrative images regarding cylinder tank mounting using a tank frame and tank straps:

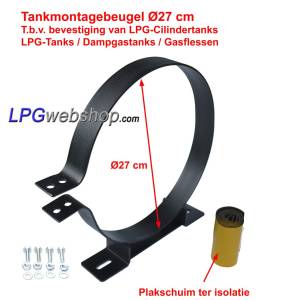
Basic Instructions for LPG Cylinder Tank Mounting using Tank Mounting Brackets with Foot
These mounting brackets are used for installing LPG vapor tanks and LPG Cylinder Tanks with a tank diameter of 200 mm up to 400 mm.

Basic Mounting Instructions:
- Secure the mounting brackets with the foot to a strong and sturdy part of the vehicle with a sufficient number and sufficiently strong bolts.
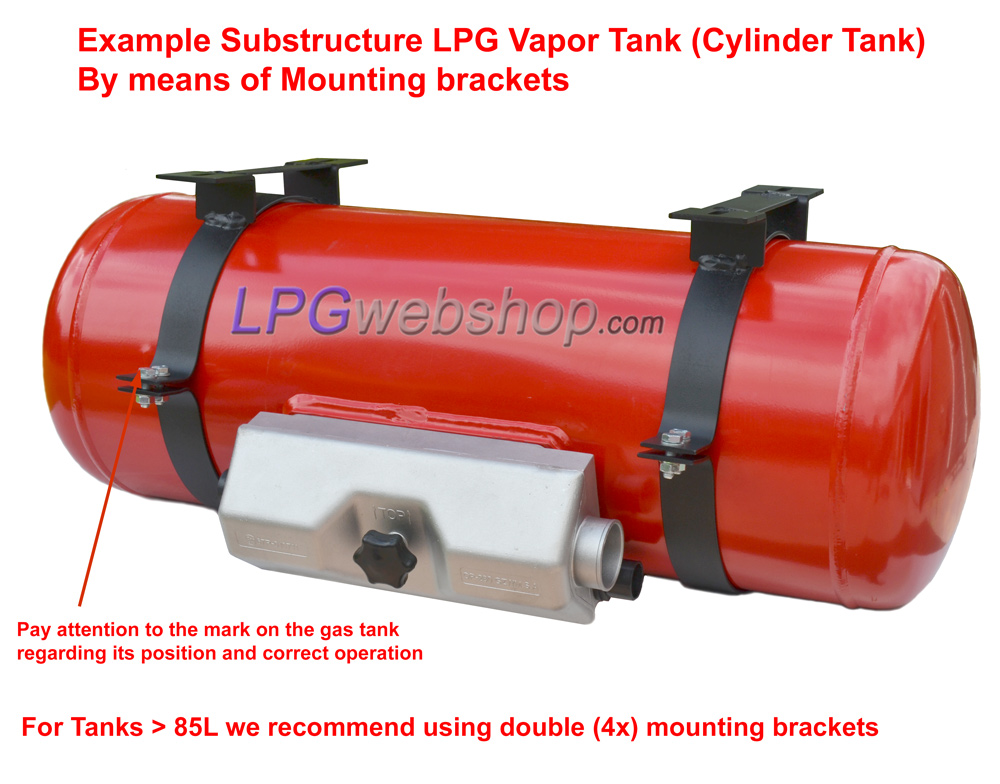
- Use the correct number of mounting brackets for your application (depending on the tank size and mounting method). The mounting brackets must fall within the weld seams of the gas tank. Use at least 4 mounting brackets for tanks larger than 85L.
- The gas tank must not make metallic contact with the tank brackets. Therefore, apply insulation inside the tank brackets so that the tank cannot make metal-to-metal contact with the brackets. (Insulation foam tape is supplied)
- Bend the mounting brackets slightly open to be able to place the gas tank inside.
- Determine the position of the gas tank carefully. Pay close attention to the marking (cross with arrow) on the gas tank for correct positioning to ensure proper operation of the gas tank. The marking indicates the top side and the horizontal midplane. Also, pay close attention to the position of the bracket flanges relative to the tank appendages (gas-tight housing), so that incoming and outgoing lines are not blocked. Use a sufficient number of bolts of the correct quality for a sufficiently strong construction.
- No weakening may be introduced into the mounting brackets, for example by drilling a hole.
LPG Cylinder Tanks larger than 150 Liters
If an LPG tank is larger than 150 Liters, the tank must be secured with a special construction. For this, a tank bracket set like the one shown below is typically used. This tank bracket set is available for cylinder tanks with a diameter of 45 cm. An insulation layer (rubber) must be applied between the tank and the tank bracket set.
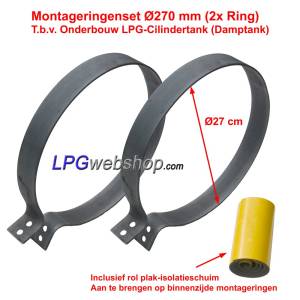
Basic Instructions for LPG Cylinder Tank Mounting using Mounting Rings welded to Angle Iron
These mounting rings are used in combination with iron angle profile for installing LPG cylinder tanks (vapor tanks) with a tank diameter of 200 mm up to a maximum of 400 mm. The mounting rings must fall within the weld seams of the gas tank. Use at least 1 mounting ring on each side of the tank appendages (so at least 2 in total) and use at least 4 mounting rings for gas tanks larger than 85L.
Basic Mounting Instructions:
Assemble the mounting rings in combination with angle strip / angle iron (or other construction material) into a sturdy and well-fitting tank frame for your gas tank and vehicle. Ensure that when you attach the mounting rings to the angle strip (by welding them together), the rings are in the closed position (just as they will sit around the gas tank.) Otherwise, the angle strip may not be at the correct angle relative to the rings. No weakening may be introduced into the mounting rings, for example by drilling a hole.

Pay attention to the position of (the marking on) the gas tank. Also, pay close attention to the position of the ends of the rings relative to the tank appendages (gas-tight housing), so that they do not obstruct incoming and outgoing lines. Use a sufficient number of bolts of the correct quality for a sufficiently strong construction. These values depend on the size of the gas tank and the national regulations. (EN 12979 / RDW installation methods).
After the tank frame is fully prepared and sized, apply a protective coating.
The gas tank must not make metallic contact with the tank frame. Therefore, use the supplied adhesive insulation and apply it to the inside of the mounting rings.
Position the gas tank on the prepared tank frame. (To do this, bend the rings slightly open.) Pay attention to the marking (cross with arrow) on the gas tank for correct positioning to ensure proper operation of the gas tank. The marking indicates the top side and the horizontal midplane.

This article is protected by copyright. (Partially) copying this article is prohibited.
Disclaimer
The information in this article is intended solely as an aid and has been compiled to align as well as possible with applicable regulations and guidelines. National regulations may differ or impose additional requirements. Installers and users are themselves responsible for (having) the gas installation checked and complying with applicable local laws and regulations. Always consult a certified professional for this.
Despite the care with which this information has been compiled, there is the possibility of errors and omissions. No rights can be derived from this article. The most recent and local official standards and regulations are always leading.
In addition to this specific disclaimer, our general disclaimer also applies, the link to which can be found in the menu in the footer (page end).